
CLAYMORE TECH SUPPORT
For all Claymore owners. This is a one-stop page for all things tech and maintenance when setting up and maintaining your Deviate Claymore
Our Owners Manual includes all things Claymore tech
✓ Links to buy the exact spare part(s) you’re looking for
✓ Torque recommendations
✓ Assembly diagrams
✓ Maintenance Interval Guide

Video Tutorials
Check out our ‘how-to’ installation and upgrade video library for all things bike maintenance
Frame Registration
Register your frame below to ensure your bike is covered by our warranty policy
Claymore Suspension Kinematics & Set-Up
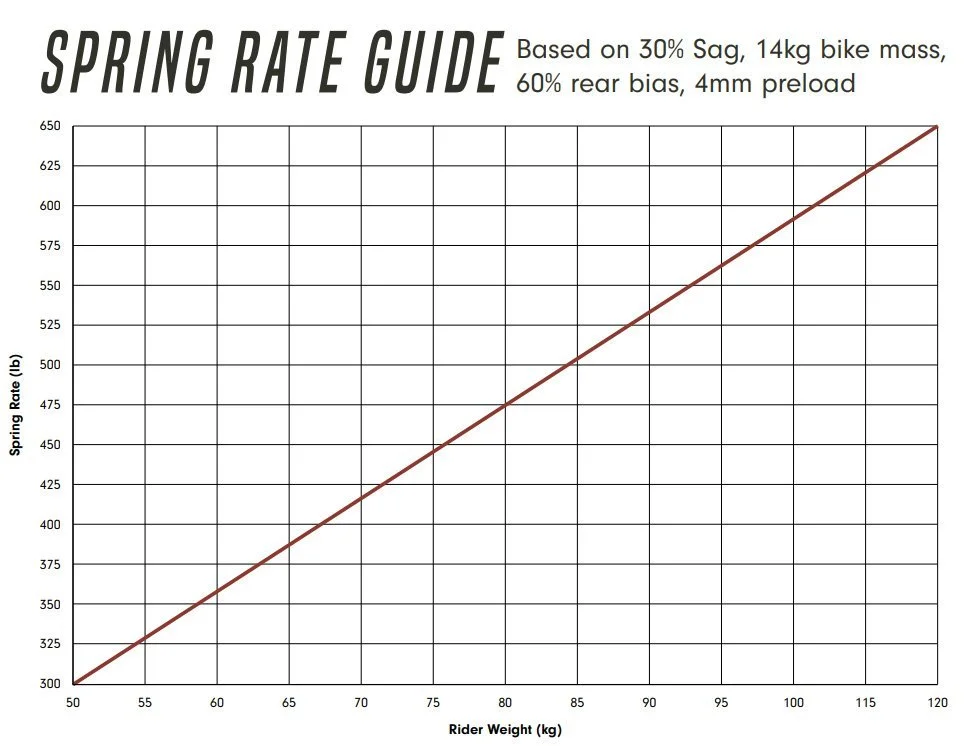
Use the table above as a general starting point when deciding which spring rate is best for you. Please be aware this is only a guide and ultimately won’t be accurate for everyone.
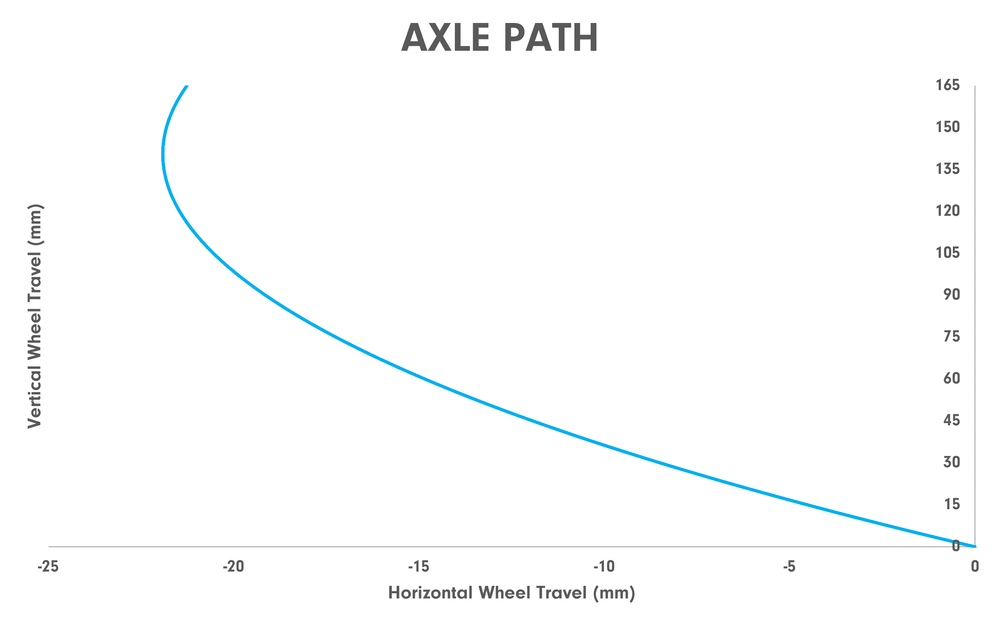
The graph above illustrates the axle path of our Deviate Claymore. This highlights the bikes rearward axle path as the bike moves through it’s travel. This is thanks to our high-pivot suspension platform which turns rough and chunky terrain into a smoother experience whilst riding.

Anti-squat/Anti-rise is used as a great indicator for potential pedal kickback and geometry conservation under braking. Thanks to the numbers on the graph above, our Claymore has minimal pedal kickback and great geometry conservation under braking - keeping you in an optimal riding position.
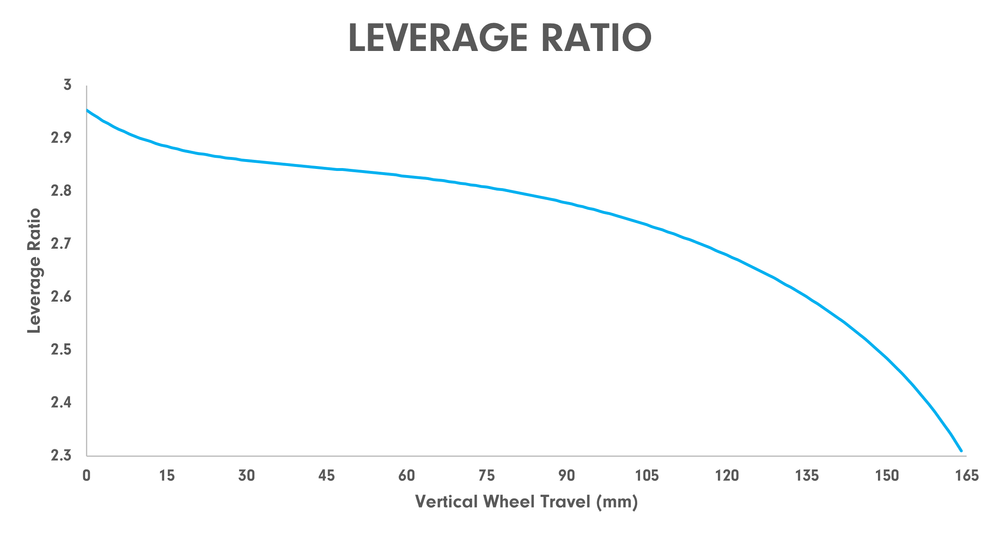
Our leverage ratios on our Claymore truly allow for a bottomless feel, making the 165mm of rear travel feel on offer feel like it has more to give, without the sluggish pedal bob typically associated with a longer travel bike. As shown in the graph above, our suspension platform offers a progressive ramp-up with a predictable and supportive mid-stroke.
Ohlins set-up guide


Damage Replacement Policy
Have you damaged your Deviate? Check out our damage replacement policy to see if we can help you get back on the trails
Lifetime Warranty
Here at Deviate we take pride in making our bikes and components last. With that being said, we offer a lifetime warranty on your new Deviate. Read more below.
FAQs
Bike Related
-
-
Yes. Navigate to the Highlander II User Manual, assembly diagrams, find the part you require using the diagrams to help, and click the part code that matches the spare that you need.
-
This isn’t possible on any of our current 29er model frames. However, we do offer the Claymore in an MX configuration both as a frameset and full build.
-
Please see the step by step guide here.
-
Unfortunately not. This would void you’re warranty.
-
For Dub BB’s use the supplied 2.5mm Deviate spacer behind the driveside BB cup and the 2mm dub spindle spacer behind the chain ring.
If you’re installing a set of SRAM dub cranks to run a 55mm chain line, so that it is compatible with the new t-mount AXS derailleur, then you need to install the following:
1x 2.5mm BB spacer on the non-driveside, behind the bb cup.
1x Deviate BB spacer on the driveside, behind the BB cup
1x 6mm dub spacer behind the chain ring.
-
No - a standard 126 link chain will work with even a 12 speed Shimano or Sram set-up.
-
ZS44/28.6 upper and a ZS56/40 lower headset cup.
-
We suggest a 170-180mm fork with a 44mm offset. A 51mm offset is compatible and will lead to a slightly more lively steering feel. We do not recommend triple clamp or dual crown forks with the Claymore.
-
Anything from 28t to 36t will work great depending on how steep your hills are!
-
Technically, yes - however, you’d need a crankset and chainring combination that can be “clocked” to account for the idler wheel. This process will require some experimentation and as such we cannot offer support on installation.
-
We’ve designed The Claymore to run 2.6” tyres as a maximum
SRAM drivetrain Setup
-
For a 32T chain ring, we recommend running 126 chain links, set-up position A, and completing the set-up on the ‘red’ cog. To be setup at sag (30%).
If you’re installing a set of SRAM dub cranks to run a 55mm chain line, so that it is compatible with the new t-mount AXS derailleur, then you need to install the following:
1x 2.5mm BB spacer on the non-driveside, behind the bb cup.
1x Deviate BB spacer on the driveside, behind the BB cup
1x 6mm dub spacer behind the chain ring.
-
We can help you get set-up instead. For a 32T chain ring, we recommend running 126 chain links, set-up position A, and completing the set-up on the ‘red’ cog.
If you’re installing a set of SRAM dub cranks to run a 55mm chain line, so that it is compatible with the new t-mount AXS derailleur, then you need to install the following:
1x 2.5mm BB spacer on the non-driveside, behind the bb cup.
1x Deviate BB spacer on the driveside, behind the BB cup
1x 6mm dub spacer behind the chain ring.
Chain guide Related
-
The idler wheel will add extra "tooth chatter" to the system. This is the trade-off caused by having it push up against the tension of the chain, in order to create a more secure chainring fit.
Make sure the chain isn't worn and is very clean and well-lubed. And not to have the idler sitting to close to the chainring, by sliding it back on the T-mount or rotating it down via the isgc tabs.
-
Absolutely. We have two lower ISCG-05 tabs which allow the use of a lower guide/bash.
Shock Related
-
The best method is by removing the front shock bolt. Then allow the shock to move backwards and rotate the shock out towards the non drive side, the rear end will then lower (and the shock moves forward). This then gives you access to the rear shock bolt which then needs to be unscrewed.
To install a shock it is the same as the above process but instead in reverse.
-
All air and coil shocks with the Metric 230*60mm should be compatible. (please check with the shock manufacturer or ourselves if you are unsure)
-
Rebound - Linear
Compression - Low
-
We suggest using the manufacturers recommendations based on your rider weight to achieve around 30% sag. Alternatively you can use the chart below as a starting point (the correct spring rate for is ultimately subjective, there is no ‘one-size fits all’ approach), use this chart as a guide only.
Guide for The Claymore (located under ‘Suspension Data’ tab)
-
We suggest around 30% for most riders, but this will vary depending on terrain and personal preference.
-
The Claymore will work with most coil or air shocks on the market - we recommend a mid-mid initial tune. We can’t guarantee that a specific shock will have clearance. The shocks available on our online store are all compatible.
Other
-
Please see our crash replacement and warranty terms and conditions.
-
Check out our in-depth high pivot explanation here
If you can’t find the answers to you question or require further assistance, please Contact Us and a member of the team will be in touch.